
Organizing your unmounted acrylic stamps
with The ScrapRack Multi-Craft
4 Step Process

This article is available with more images on our website - click here to view it now.
Unmounted acrylic stamps have made stamping more popular than ever. Acrylic stamps are more affordable, clear acrylic blocks make stamping easier and new manufacturers are consistently presenting us with great new designs. Before your stamping hobby gets overwhelming and becomes an organization frustration, establish a good system for organizing your stamps. Once the system is in place it will be easy to stick with it and stay organized. Follow these steps to incorporate your acrylic stamps into your ScrapRack System. (If you’ve got wood mounted stamps we’ll help you with those too – there are some tips for incorporating mounted stamps at the end of this article.)
Just have a few stamps? Scroll to the bottom of the article to learn what to do with them.
Step #1 – Create an Index of Stamp Themes A-Z
Before you start sorting and organizing it’s important to have a basic outline of the categories of stamps you own. Think of them in 3 major groups:
Letters, Numbers, and Punctuations Marks – Basically Alphabet Sets
Seasons and Holidays – Spring, Summer, Fall, Winter
Themes A-Z – Different for every stamper
The first and second categories are easy, the first consists mostly of Alphabet Stamp Sets and the Second is exactly as it is labeled, Holidays and Seasons. In most cases you’ll have the holidays mixed right in with the seasonal stamps. The third category though requires a bit of thought and creating an Index will make it easier to categorize them. You’ll find that many of your stamps will fit in multiple categories. Your Themes A-Z Index might look something like this:
Baby
Beach
Birthday
Boys
Camping
Cooking
Family
Girls
Patterns
Shapes
Sports
Travel
Words
Here’s a common question, why not just incorporate your Seasonal and Holiday stamps into your Themes A-Z Stamps? Well, much like using a ScrapRack for Scrapbooking and Cardmaking, you want to keep things together you would use together. So if you put Winter Stamps together under “W” they would no longer be next to Christmas Stamps which would then be under “C”, there’s a good chance that something you have for Christmas might also work on a Winter project – by putting your holidays in with the seasons, you’ll see all the stamps you have that might work for a particular project.
Step 2 – Label sheets of 12x12 cardstock with the name of each category.
You’ll most likely need more than one labeled sheet for some categories, but you can start with just one and then add more as you need them. You can also use 8 ½ x 11 paper, I prefer 12x12 because you can get more images on each page.
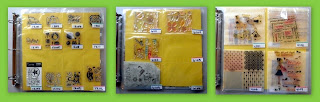
Step 3 – Get your ScrapRack Pocket pages numbered.
The easiest way to number your pocket pages is to use File Folder labels from the office supply store. I cut the labels in half. I found that most stamps fit into one of 3 ScrapRack Pages, the Dream Dozen (12) for smaller stamps, the Perfect Six (6) for medium sized stamp sets, the Fabulous Four (4) – Ideal for CTMH stamp sets.
I assigned numbers to each pocket using the number of pockets on a page as the first digit(s) of the number. This is important because you want to fill all the pockets in numerical order. The subject matter of the stamp is NOT important, just the size. This will allow you the best and most economical use of your storage pages. You can also “double-up” that is, label both sides of the pocket front and back so you can put 2 stamps in each pocket. This does create a heavier page, but it is more economical.
Put all your numbered pocket pages onto a Spinder.
.jpg)
Step 4 – Begin cataloging and numbering your stamps.
Begin cataloging with the first stamp in the first pocket. Stamp an impression of the stamp on each of the labeled catalog sheets where the stamp might fit the category – i.e. if you have a stamp that is a “wrapped gift box” - this stamp would work in Birthday, Baby, Graduation, Wedding, Christmas,… You’ll want to stamp it out on each of the catalog pages. Next to each impression write the number of the pocket where the stamp will be stored. Clean the stamp and return it to its pocket. Rather than stamp the images I photocopied them and then pasted them onto the sheets. If you’re going to do this, I recommend copying them at full size. However, stamping them is faster and more efficient.
Once you’ve stamped all the images everywhere they might possibly be appropriate, slip the 12x12 Catalog sheet into Super Sized Single Pages and put them on a Spinder. Now you’ve got a complete catalog of all your stamps. When you need to find a particular stamp, flip to that Theme or Holiday and the numbered image will tell you exactly where to find the stamp.
Adding new stamps to your system.
Each time you purchase a new stamp, add an impression of it to your Catalog Sheets. Remember to stamp in every category where it might be appropriate.
This new stamp is going to fill the next available pocket in the appropriate size pocket page. Add the pocket number to the stamped image, put the stamp in the pocket and you’re done. Easy.
What are the benefits to this organization system?
First you’ll be able to find them more quickly and easily.
Using the ScrapRack pocket pages makes your stamps more visible and accessible, which in turn makes them easier to use, and easier to put away. This will translate into using them more, having more fun, and getting more done, when you do have time to stamp.
When you go to a crop or class, rather than taking your entire stamp collection, you can easily take just the stamps you know you are going to want to use. If you don’t know which stamps you want to use, just take your catalog pages and some sticky notes. Create your page or project, and leave a space where you want to add a stamp from your catalog. Using one of the sticky notes, write the number of the stamp and put the sticky note on the space on your project. When you get home you can finish the project. You won’t have had to haul all of your stamps, tools, inks, etc. with you, but will have had all of your choices available.
If you’re attending a stamping event, like a CTMH event, or you’re headed to the stamp/craft store, you can take just your catalog with you. That way you’ll be able to compare what you want to purchase with what you’ve already got – you’ll spend more wisely, buying stamps that compliment rather than duplicate what you already own.
Adding in your MOUNTED Stamps
With mounted stamps, you would follow the same procedure of grouping your stamps by size, writing a number on the edge of the wood block and then storing them numerically in drawers or totes. Add the images of the mounted stamps to the catalog sheets in the appropriate categories. You may want to use the letter M in front of the numbers so you can easily identify that stamp image as one you will find in the “M”ounted stamp container.
What if you just have a few stamps?
There are many crafters who just have a few stamps and don’t intend to become a more serious “stamper.” If you’re just an occasional stamper, you can store your stamps right in with all of your other Scrapbooking/Papercrafting supplies in your ScrapRack. Just slip the stamp into a pocket page in the appropriate section of your ScrapRack. If the stamp has multiple uses, like the gift box stamp mentioned previously, just stamp out a few impressions on plain paper. Note on the paper where you’ve got the stamp stored, i.e. “see birthday section” and slip the stamped impressions into pockets in the appropriate sections. Now when you look in your Christmas Section, Wedding Section, or Graduation Section, you’ll see an impression of the stamp, you’ll be reminded that you’ve got it, and chances are you’ll get more use out of it. Who knows, you may even be inspired to become a full fledged “Stamper.”
Tips and Tricks
Read this article on our website to see more images - click here.If your stamp came in a package that had a background card with the image of the stamp printed on the card. Use the card as the background in the storage pockets.

To make it easier to put stamps away when you’re done with them, write the pocket number on the thin sheet of plastic that holds yours stamp set together. We’ve done it at the top of this stamp. It’s number – 6102
If you’ve got a stamp on loan to a friend, put a reminder note in the pocket where the stamp belongs. Indicate on the note to whom and when you lent it out.
If you’re using CTMH stamps, use the lightweight foam pad they come packaged with in the pocket with the stamp. Not only does it provide and extra layer of protection, it also keeps your stamp from sliding around in the pocket.
While you’re working with your storage pages keep them on a Spinder, but off your ScrapRack. This will make the easy to load but keep them from “slipping” around.


