
Hi Scrappers -
We've got another Scrapper on a mission to get organized who is willing to share her struggles and success. Please take a moment to visit her Blog and cheer her on as she tackles her organization challenge.
You Go Girl - http://www.love2scrap-n-crop.com/blog/
Tiffany
12.31.2010
12.21.2010
Inspired to Get Organized
Hi All -
Thanks so much for all of the positive feedback about the 2011 Get Organized Challenge. I'm looking forward to working with all of you in the coming months. This morning I got an email from one of our Customers, Terri M. about what to do with her "PURGE". For those of you who aren't familiar with that term as it relates to Craft Organization, it's all the stuff you have, that you will never use. Terri found a joyful home for her "Purged" items at Ronald McDonald House. Whether you're taking the Challenge or not, this is a great time to think about giving. For most of us, knowing we are doing something that helps others can make a painful task a little, sometimes a lot, easier. Over the next couple of weeks I'm challenging you to find a good home for your "Purge." Make a personal commitment to donate, and then tell someone you're going to do it, write it down for everyone to see. Be BOLD!!!

Thanks so much for all of the positive feedback about the 2011 Get Organized Challenge. I'm looking forward to working with all of you in the coming months. This morning I got an email from one of our Customers, Terri M. about what to do with her "PURGE". For those of you who aren't familiar with that term as it relates to Craft Organization, it's all the stuff you have, that you will never use. Terri found a joyful home for her "Purged" items at Ronald McDonald House. Whether you're taking the Challenge or not, this is a great time to think about giving. For most of us, knowing we are doing something that helps others can make a painful task a little, sometimes a lot, easier. Over the next couple of weeks I'm challenging you to find a good home for your "Purge." Make a personal commitment to donate, and then tell someone you're going to do it, write it down for everyone to see. Be BOLD!!!
12.17.2010
2011 Organization Challenge
Hello Crafters -
We've set up our schedule for the Get Organized Challenge. As you may already know it will begin on Tuesday, January 11th at 10:00am (pst).
Before I commit to a topic schedule, Karen suggested I ask you what you found most difficult when it comes to getting organized.
If you're facing specific challenges please email me or comment here on the blog and let me know. While there are some standard things to cover, we want to be sure this challenge is genuinely helpful to all of you.
Looking forward to your input,
Tiffany
TSpaulding@TheScrapRack.com
12.12.2010
The Get Organized Challenge is ON!!!
We've had a GREAT response to the Get Organized Challenge. We'll begin the 15 minute webinars on Tuesday, January 11th at 1:00pm EST (10am PST). If you haven't put in your information for an invitation, please follow this link and complete the small form at the end of the page. This will insure you get an invitation with the login codes you'll need to join the Webinar. We hope to start promptly at 1:00, so please feel free to login a few minutes early and introduce your self.
Here's a link to the Invitation Page - click here.
Remeber, if you can't attend the actual Webinar, you'll be able to get a "recorded" version of the Webinar. This will go out via email to everyone on the list. Please fee free to forward this link on to any of your crafty friends that could use some help getting organized.
Tiffany
12.05.2010
Get Organized Webinar
Hi Crafty Ladies -
We are thinking about hosting a "Get Organized" Webinar beginning in January. We're considering two different formats - a 2 hour, basically "lecture" style event, or a weekly 15 minute event.
The two hour event would be similar to the seminars we teach around the country. The weekly event would be more "project based". We would discuss one particular type of thing and then give out a weekly "assignment" for getting that thing organized. When we met the following week webinar participants could upload photos, discuss challenges, and most importantly Share Success!!!
What are your thoughts? Do you have organizationally challenged crafty friends? We'd love to know what their thoughts are as well so please feel free to share this blog post with them.
Looking forward to hearing what you have to say,
Tiffany

11.20.2010
Crop Crate Combo - Available for a limited time
Hi Crafters -
Are you looking for the perfect way to....
Get to a Crop?
Store your supplies?
Work at the Dining Room Table?
The Crop Crate Combo is EXACTLY what you need!

The Crop Crate is a collapsible rolling tote that will hold all 7 Spinders from your ScrapRack, as well as a base unit and wings. Use it to transport your supplies to a crop, class or friends house. You'll be packed up and ready to go in no time.
Need to store your supplies away when you're not using them? This is the perfect option.
Cropping at your dining room table or other shared space in your home is so easy with the Crop Crate Combo. Learn more now - click here.
Are you looking for the perfect way to....
Get to a Crop?
Store your supplies?
Work at the Dining Room Table?
The Crop Crate Combo is EXACTLY what you need!
The Crop Crate is a collapsible rolling tote that will hold all 7 Spinders from your ScrapRack, as well as a base unit and wings. Use it to transport your supplies to a crop, class or friends house. You'll be packed up and ready to go in no time.
Need to store your supplies away when you're not using them? This is the perfect option.
Cropping at your dining room table or other shared space in your home is so easy with the Crop Crate Combo. Learn more now - click here.
11.01.2010
Stamp Organization
Hi Crafters -
We've gotten lots of questions about organizing stamps since we started Blogging Along with Jean the Boarderline Hoarder. Here's a couple of article links. The first is for stamps, the second takes into account a varitey of products that are difficult to organize and remember.
Acrylic Stamp Organization System
Stamps, Punches and Personal Die Cut Systems
Thanks,
Tiffany
10.26.2010
Boarder Hoarder Part 2
Hi Crafters -
Well, I've gotten an update and some pictures from Jean. She's so much fun and she's making my job really easy! Here's what she has to say (scroll down to see some pictures):
From Jean
Well, I thought I was close to getting you some more pics, but .....in those closets I found ...yep, more stamps!! OMG! I have tagged 1400 now and still have probably 50 more to go...maybe...give or take. And, those that I thought I could "purge"...well, nope, can't do it because I found out (in the nick of time I might add!! lol) that we are expecting our first "two legged" grandchild next year! We already consider ourselves grandparents since our daughter has a pug named Henry and our son has a blue heeler named Hank. So, those baby, lullaby, cutesy kid stamps will come in handy soon!

 This is definitely a huge, huge project I have undertook and I'm so glad I did my research on the scraprack and attended your class. This system is going to be a tremendous help for me now that I have even more purpose to organize everything properly. The unit(s) are suppose to be arriving tomorrow.
It is amazing now that I have 1400 stamps in photo boxes on my shelves (approx 37 boxes and growing) that I actually "shrunk" them down on paper to 20+ pages for the rack! I numbered them all individually, stamped them on paper, then like paper doll cut-outs, I cut them out and sorted them by calendar, theme, alpha and rainbow, then pasted them onto those particular sheets. This system will definitely knock out the amount of time needed in search of a certain stamp I want to use.
I am attending my last convention this weekend and I'm hoping that they don't have any stamps! I am going to try very, very hard to be "good" and not add to the stock I have. In fact, of the scrapbook paper, stamps (doubles and triples plus those I know I won't be using), trimmers, etc. that I don't require any longer, I am "purging" into a wicker basket and giving it up for the charity auction that we are having at the convention.
Well, that's it from this end. Once all of this is under control, I'll feel so much better...even if it is only half under control!
Take care.
Jean

Well, I've gotten an update and some pictures from Jean. She's so much fun and she's making my job really easy! Here's what she has to say (scroll down to see some pictures):
From Jean
Well, I thought I was close to getting you some more pics, but .....in those closets I found ...yep, more stamps!! OMG! I have tagged 1400 now and still have probably 50 more to go...maybe...give or take. And, those that I thought I could "purge"...well, nope, can't do it because I found out (in the nick of time I might add!! lol) that we are expecting our first "two legged" grandchild next year! We already consider ourselves grandparents since our daughter has a pug named Henry and our son has a blue heeler named Hank. So, those baby, lullaby, cutesy kid stamps will come in handy soon!

Jean's Old Stamp Wall

Jean's New Number Stamp Storage System.
It is amazing now that I have 1400 stamps in photo boxes on my shelves (approx 37 boxes and growing) that I actually "shrunk" them down on paper to 20+ pages for the rack! I numbered them all individually, stamped them on paper, then like paper doll cut-outs, I cut them out and sorted them by calendar, theme, alpha and rainbow, then pasted them onto those particular sheets. This system will definitely knock out the amount of time needed in search of a certain stamp I want to use.
I am attending my last convention this weekend and I'm hoping that they don't have any stamps! I am going to try very, very hard to be "good" and not add to the stock I have. In fact, of the scrapbook paper, stamps (doubles and triples plus those I know I won't be using), trimmers, etc. that I don't require any longer, I am "purging" into a wicker basket and giving it up for the charity auction that we are having at the convention.
Well, that's it from this end. Once all of this is under control, I'll feel so much better...even if it is only half under control!
Take care.
Jean

10.01.2010
Meet Jean - The Border Hoarder
I'd like to switch things up a bit and introduce you to Jean and her adorable dog Inky.


I met Jean (but not Inky) at a recent CK Convention. She had done lots of research on the ScrapRack and signed up to take our seminar so she could get the full story. She sat, as most "A" students do, at the front of the class. As we got into the discussion of storing your supplies, she confessed openly and without reservation "I'm a Borderline Hoarder," "Yes," she said "I'm a BorderHoarder". Her revelation resonated with the class and like any other addiction, we felt compelled to applaud her honesty. Okay, maybe I'm overdoing it a bit. But the truth is, Jean was ready to embark on her own 12 step program to getting organized. She told us that she was following our methods for sorting and organizing her stamps, and that she had gotten through cataloging 1300 - YES 1300 stamps just before coming to the Convention. I'm going to blog about Jean and her progress as she organizes not 1 but 2 craft rooms. Please check back periodically to see how she's doing, offer encouragement and perhaps you'll find yourself motivated to follow in her footsteps.


I met Jean (but not Inky) at a recent CK Convention. She had done lots of research on the ScrapRack and signed up to take our seminar so she could get the full story. She sat, as most "A" students do, at the front of the class. As we got into the discussion of storing your supplies, she confessed openly and without reservation "I'm a Borderline Hoarder," "Yes," she said "I'm a BorderHoarder". Her revelation resonated with the class and like any other addiction, we felt compelled to applaud her honesty. Okay, maybe I'm overdoing it a bit. But the truth is, Jean was ready to embark on her own 12 step program to getting organized. She told us that she was following our methods for sorting and organizing her stamps, and that she had gotten through cataloging 1300 - YES 1300 stamps just before coming to the Convention. I'm going to blog about Jean and her progress as she organizes not 1 but 2 craft rooms. Please check back periodically to see how she's doing, offer encouragement and perhaps you'll find yourself motivated to follow in her footsteps.
9.02.2010
Inspired to Scrap!!!
Okay - this whole process has really inspired me to Scrap. As I've been working on this room, we've had a set of pictures pulled out to use in the photos of the room going together. Today, I finally sat down at the desk and did a bit of scrapping.
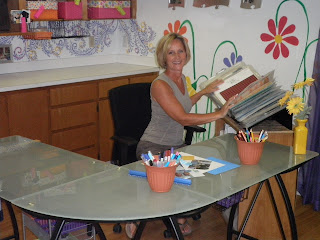


For those of you who know me well, you know my father passed away almost 3 years ago. I've been moving this pile of pictures around for the last year, trying to find time to turn it into a layout that conveyed the silly, fun, loving man my father was. He was a wonderful grandfather to my boys and an incredible husband to my mother. I decided to keep the layout simple - like sunshine. I didn't actually get time to "glue" it together, but here's the almost finished, first work of art from my new Scrapbook Room.

The light is a little bit "wonky", but you get the idea.
Thanks so much for taking a break from the "getting the room" together series with me. I'll be back on track with photo storage and printer set up soon.
Happy Crafting,
Tif
8.31.2010
Keeping things Visible and Accessible
This whole experience has been so much fun. Especially sharing it with all of you. I'm finally putting the details together and creating a space that really functions.

This is the view from behind my desk. As I've mentioned in previous posts, my goal is to keep my desktop clear so I'll have lots of room to work without burying anything. To that end I've put lots of thought into making the space below the desk function efficiently.
Rolling Cart to the right

The rolling cart which slides in to my right when I'm working is where I have all of my "every time" necessities. Things like; adhesives, scissors, basic chalks, etc. I haven't filled all the little baskets. Once I start scrapping I want to be able to have space available for things that I may have forgotten or possibly new things I'll discover at the next SB Show. (YIPEE!!!)
I love having thing on wheels! They offer the maximum in accessibility. I can roll the cart up close or push it easily under the desk if I don't need it. I used the baskets instead of just putting things into the cart itself. The baskets make it easy to move things around. Once I start using the desk to actually Scrap, I may want to rearrange the items.
Hanging Baskets to my left.

The second tier of this hanging basket (IKEA) was the perfect place to put the photos I'll be using on my current project. Again, they are right at my fingertips, but they won't get buried under my "creative" mess.
Putting the photos into the small purple basket makes it easy to grab them all at once.
I was even able to hang my favorite pair of scissors through the grid on the basket - those won't get buried either! Ahhh...I'm rapidly approaching scrapper's heaven!
Thanks for following along. I'm looking forward to reading your comments.
Happy Crafting!
Tif
8.18.2010
Chipboard Organization in our new Crop Room
The Chipboard Challenge - How to keep bulky chipboard organized, visible and accessible?
Hmmm....love my chipboard, but sometimes I forget that I have it. It was stashed away in a drawer where it was "out of site, out of mind." Other than a note in the Alpha Numeric section of my ScrapRack I didn't have any reference to it. Enter the old "Sticker Stadium." Many of you have seen this tool before. At one time I used it on my desktop for tools. Since my goal with this crop room was to keep the desktop clear I emptied this out as a tool bin and VOILA! it was the perfect place for chipboard. I don't think this particular item is still available, but I think you can get something similar at the Container Store or Storables for use with cosmetics.


 The finished container makes an easy to see, easy to access file system. I can simply flip through the chipboard letters to find exactly what I need. In keeping with my philosophy about having things easy to move around, I placed this container on the open shelf next to my desk so I can bring it out when I need it, but it's still visible so I'll remember I've got it and I'll actually use it. Imagine that!
Thanks so much for visiting out Blog. I've got another entry coming up very soon. We don't have a show until next week so I've got a little extra time to finish up and I'm really excited.
Hmmm....love my chipboard, but sometimes I forget that I have it. It was stashed away in a drawer where it was "out of site, out of mind." Other than a note in the Alpha Numeric section of my ScrapRack I didn't have any reference to it. Enter the old "Sticker Stadium." Many of you have seen this tool before. At one time I used it on my desktop for tools. Since my goal with this crop room was to keep the desktop clear I emptied this out as a tool bin and VOILA! it was the perfect place for chipboard. I don't think this particular item is still available, but I think you can get something similar at the Container Store or Storables for use with cosmetics.

The first thing I did was sort my chipboard by sizes.
I've got lots of small alphabets, quite a few 10" letters and several 12x12 sheets of themed chipboard.

Once sorted, I put the smaller pieces in the front of the container, and then filled in the center by size and finished up with the 12x12 sheets.

Thanks so much for visiting out Blog. I've got another entry coming up very soon. We don't have a show until next week so I've got a little extra time to finish up and I'm really excited.
7.27.2010
Getting moved into our cheery new crop room! - 3rd Entry
The first thing in was my ScrapRack of course. I brought in a small shelving unit from my old office and placed it at an angle at the end of my work desk. My goal with this space is to leave the actual work space on my desk as clean as possible so I'll have lots of room to create! I've only added a couple of Spinders back onto the ScrapRack. I'm going through them again, page by page to be sure I've "purged" everyting I don't need.


I used the shelves under my ScrapRack to hold my Paper Storage Boxes

As part of my plan to keep everything off the desk top, I used a "purse hanger" (you know, one of those things you're supposed to use to hang your purse off a table when you're out to dinner) to hang my favorite paper trimmer off the edge of my desk. It's accessible, its visible, it's easy to get to, and there's no way it can get buried. HOOORAY for that!

Pens, Pencils, Scissors, Rulers.....these items present a huge problem for visbility, accessiblity, and still avoiding stuff on the desk top. I filled this adorable plant stand with plastic "terra-cotta" looking planters. Then I filled each planter with the items listed above. It's easy to see all of them, and when I want to use them, I just pull the "planter" from rack and set it on my desk top. When I'm finished, it's easy to put away
I still haven't filled the shelves or cabinets yet. I'll be working on those this next week, We're gong to the Santa Clara Scrapbook Expo next weekend, so that could slow me down. It you're planning on attending, please stop by the booth and say HOWDY!
Thanks for joining me on my quest to be organized!
Tiffany
7.20.2010
Giant Flowers and Bright Curtains
Oh, we're getting so close. The flowers are painted and the curtains are hung! It is really starting to look good. It's amazing what you can accomplish in a clean space with a few jars of paint!


One of our goals with this project was to try and keep it as inexpensive as possible. We spent about $25 on paint. The bright colored shear curtains were purchased at Big Lots for just $5 each panel.

Now that the painting is done, it's time to start moving in. Please check back in a day or two and see what progress we've made.
Tif
7.12.2010
Crop Room at the Office Next Step
Okay -
We finally decided on a bright and cheery room with Fun Flowers!!! I know for many of you this doesn't seem like that big of a deal, but I am the only female inhabitant in my house, so "girly" things are few and far between. Today we took the doors off the cupboards. When you're creatiing a work space, you want to have everything easily accessible. If you remove the doors from your cabinets, not only are the items stored there more accessible, your less likely to resort to the "cram and close" method of storage.
This is me in my TomBoy Tool Belt - it has a pocket that is perfect for holding my camera - taking doors off cabinets.
This is the adorable PJ - my mom's darling dog, she was a huge help.

Here's mom, artist at large, designing the big flowers for our crop room walls.


We finally decided on a bright and cheery room with Fun Flowers!!! I know for many of you this doesn't seem like that big of a deal, but I am the only female inhabitant in my house, so "girly" things are few and far between. Today we took the doors off the cupboards. When you're creatiing a work space, you want to have everything easily accessible. If you remove the doors from your cabinets, not only are the items stored there more accessible, your less likely to resort to the "cram and close" method of storage.
This is me in my TomBoy Tool Belt - it has a pocket that is perfect for holding my camera - taking doors off cabinets.

This is the adorable PJ - my mom's darling dog, she was a huge help.

Here's mom, artist at large, designing the big flowers for our crop room walls.

These are all the colors we're using, The Tootsie Rolls were our lunch of choice.

Okay, we're off to a good start. Please check back in with us in a day or two to see how this Crop Room is coming along. We do have the Puyallup Scrapbook Expo at the end of the week, so that may put me behind on the blogging but I'll do my best.
Thanks for checking in!
Tif
7.02.2010
Finally a Crop Room at the office!!!
HOORAY - We've finally got space at the office to create a Crop Room. I'm not sure if that's good or bad - I might have trouble getting my work done if I can slip into the room next door and Scrap.
Anyway, we thought this would be a great way to show you how we put some of what we preach into practice. So I'll be Blogging along as we get this room ready to use. Here are the first couple of pictures of the room.
Pic #1 EVERYTHING OUT
I started by gathering all the Scrapbook Supplies together and putting them into a separate room. If you're creating a new room or space I would certainly recommend this. It's ugly, but it makes things so much easier when it's time to start putting things away.

Pic #2 - MY PURGE BOX
If you've taken our seminar or watched our video, you know that I'm a huge advocate of "purging" your supply stash on a regular basis. This was a great opportunity to "purge." I had a whole box of supplies that the art teacher at my boy's school was delighted to receive.

Pic #3 - OUR NEW ROOM WITH A DESK
The new room is actually too big to be an efficient scrapbook room. Again, if you've taken my seminar or watched the video, you know I strongly believe that having everything within "arms reach" or should I say "rolling chair reach" is one of the biggest keys to getting scrapping done with as little frustration as possible. In order to make this "big" room "small" we used an "L" shaped desk. The cabinets were already here. They are kind of a funky set up, so we'll have to see what we can do to make them more user friendly.
What happens next?
Next we go to Atlanta for the Scrapbook Expo. When we get back we'll decide how to decorate and then we'll start the painting and decorating process. That's the fun stuff. I hope you'll find time to check back in the week after the Atlanta show and see how things are coming along.
Thanks for visiting our Blog,
Tif
6.18.2010
Embellishment Organization

If you haven't added your Embellishments to your ScrapRack now is the time to do it. The ScrapRack is designed to hold all types of crafting supplies, not just the "flat stuff." If you haven't moved your Brads, Eyelets, Glitter, Beads,....into your ScrapRack System, you aren't getting maximum use of your investment. The Embellishment Storage page is a perfect place for your "heavy" embellishments, the Dream Dozen Page will store literally dozens of brads, eyelets, beads... and the WrapAround Ribbon and Fiber Cards will keep all of your ribbons and fibers, tangle-free and accessible.
Read up on Embellishment Organization on our website - Here's a link to a brief article on embellishments.
6.14.2010
Jewelry and Beading Organization
Are you looking for a great way to organize your Jewelry and Beading Supplies?
Use small ziplock bags for your beads and finding then slip them into our pocket pages. We used the Dream Dozen Page in the example below, but the Embellishment Storage Pages would work equally well. We also slipped our tray into a SuperSized Single Pocket. It worked great.
When you're ready to create all of your products will be visible and accessible.
Try designating a single page for each project you're working on. This will keep eveyrthing in one place so when you're ready to create you're organized and ready to go! If you like to craft away from home, you can easily take your jewelry and beading tools with you in a TravelPack.

The ScrapRack is the perfect answer.
You can group your beading/Jewelry making supplies by Color and Style. Group your findings by Gold/Silver, etc. Use small ziplock bags for your beads and finding then slip them into our pocket pages. We used the Dream Dozen Page in the example below, but the Embellishment Storage Pages would work equally well. We also slipped our tray into a SuperSized Single Pocket. It worked great.
When you're ready to create all of your products will be visible and accessible.
Try designating a single page for each project you're working on. This will keep eveyrthing in one place so when you're ready to create you're organized and ready to go! If you like to craft away from home, you can easily take your jewelry and beading tools with you in a TravelPack.

6.02.2010
Rulers, Journaling, Self-Healing Mat - Put them in your ScrapRack
Okay Crafters -
Are you looking for a place to store your rulers, templates, maybe a small self-healing mat? Why not slip them into a ScrapRack Storage page? I slipped my rulers into a Four-in-a-Row page, my self-healing mat into a SuperSized Single and my journaling grids into a Mix-n-Match. I put the pages onto a Spinder and put them all onto my ScrapRack.
When I pack up for a crop or class, I've got them in my Crop Crate with all my other supplies. It's just so easy.

If you're looking for the best way to get to a Crop or Class with your supplies, the a Crop Crate from office depot with our Crop Crate Apron could be the perfect solution. It's a simple way to pack everything quickly and easily, with the bounce of the lid on the Crop Crate working as an additional table top. It's perfect.

Want to learn more about the ScrapRack? Click here to visit our Watch and Learn Page.
5.31.2010
Stamp Organization - Step by Step
Organizing your unmounted acrylic stamps
with The ScrapRack Multi-Craft
4 Step Process

This article is available with more images on our website - click here to view it now.
Unmounted acrylic stamps have made stamping more popular than ever. Acrylic stamps are more affordable, clear acrylic blocks make stamping easier and new manufacturers are consistently presenting us with great new designs. Before your stamping hobby gets overwhelming and becomes an organization frustration, establish a good system for organizing your stamps. Once the system is in place it will be easy to stick with it and stay organized. Follow these steps to incorporate your acrylic stamps into your ScrapRack System. (If you’ve got wood mounted stamps we’ll help you with those too – there are some tips for incorporating mounted stamps at the end of this article.)
Just have a few stamps? Scroll to the bottom of the article to learn what to do with them.
Step #1 – Create an Index of Stamp Themes A-Z
Before you start sorting and organizing it’s important to have a basic outline of the categories of stamps you own. Think of them in 3 major groups:
Letters, Numbers, and Punctuations Marks – Basically Alphabet Sets
Seasons and Holidays – Spring, Summer, Fall, Winter
Themes A-Z – Different for every stamper
The first and second categories are easy, the first consists mostly of Alphabet Stamp Sets and the Second is exactly as it is labeled, Holidays and Seasons. In most cases you’ll have the holidays mixed right in with the seasonal stamps. The third category though requires a bit of thought and creating an Index will make it easier to categorize them. You’ll find that many of your stamps will fit in multiple categories. Your Themes A-Z Index might look something like this:
Baby
Beach
Birthday
Boys
Camping
Cooking
Family
Girls
Patterns
Shapes
Sports
Travel
Words
Here’s a common question, why not just incorporate your Seasonal and Holiday stamps into your Themes A-Z Stamps? Well, much like using a ScrapRack for Scrapbooking and Cardmaking, you want to keep things together you would use together. So if you put Winter Stamps together under “W” they would no longer be next to Christmas Stamps which would then be under “C”, there’s a good chance that something you have for Christmas might also work on a Winter project – by putting your holidays in with the seasons, you’ll see all the stamps you have that might work for a particular project.
Step 2 – Label sheets of 12x12 cardstock with the name of each category.
You’ll most likely need more than one labeled sheet for some categories, but you can start with just one and then add more as you need them. You can also use 8 ½ x 11 paper, I prefer 12x12 because you can get more images on each page.
Step 3 – Get your ScrapRack Pocket pages numbered.
The easiest way to number your pocket pages is to use File Folder labels from the office supply store. I cut the labels in half. I found that most stamps fit into one of 3 ScrapRack Pages, the Dream Dozen (12) for smaller stamps, the Perfect Six (6) for medium sized stamp sets, the Fabulous Four (4) – Ideal for CTMH stamp sets.
I assigned numbers to each pocket using the number of pockets on a page as the first digit(s) of the number. This is important because you want to fill all the pockets in numerical order. The subject matter of the stamp is NOT important, just the size. This will allow you the best and most economical use of your storage pages. You can also “double-up” that is, label both sides of the pocket front and back so you can put 2 stamps in each pocket. This does create a heavier page, but it is more economical.
Put all your numbered pocket pages onto a Spinder.
.jpg)
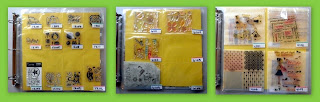
Step 4 – Begin cataloging and numbering your stamps.
Begin cataloging with the first stamp in the first pocket. Stamp an impression of the stamp on each of the labeled catalog sheets where the stamp might fit the category – i.e. if you have a stamp that is a “wrapped gift box” - this stamp would work in Birthday, Baby, Graduation, Wedding, Christmas,… You’ll want to stamp it out on each of the catalog pages. Next to each impression write the number of the pocket where the stamp will be stored. Clean the stamp and return it to its pocket. Rather than stamp the images I photocopied them and then pasted them onto the sheets. If you’re going to do this, I recommend copying them at full size. However, stamping them is faster and more efficient.
Once you’ve stamped all the images everywhere they might possibly be appropriate, slip the 12x12 Catalog sheet into Super Sized Single Pages and put them on a Spinder. Now you’ve got a complete catalog of all your stamps. When you need to find a particular stamp, flip to that Theme or Holiday and the numbered image will tell you exactly where to find the stamp.
Adding new stamps to your system.
Each time you purchase a new stamp, add an impression of it to your Catalog Sheets. Remember to stamp in every category where it might be appropriate.
This new stamp is going to fill the next available pocket in the appropriate size pocket page. Add the pocket number to the stamped image, put the stamp in the pocket and you’re done. Easy.
What are the benefits to this organization system?
First you’ll be able to find them more quickly and easily.
Using the ScrapRack pocket pages makes your stamps more visible and accessible, which in turn makes them easier to use, and easier to put away. This will translate into using them more, having more fun, and getting more done, when you do have time to stamp.
When you go to a crop or class, rather than taking your entire stamp collection, you can easily take just the stamps you know you are going to want to use. If you don’t know which stamps you want to use, just take your catalog pages and some sticky notes. Create your page or project, and leave a space where you want to add a stamp from your catalog. Using one of the sticky notes, write the number of the stamp and put the sticky note on the space on your project. When you get home you can finish the project. You won’t have had to haul all of your stamps, tools, inks, etc. with you, but will have had all of your choices available.
If you’re attending a stamping event, like a CTMH event, or you’re headed to the stamp/craft store, you can take just your catalog with you. That way you’ll be able to compare what you want to purchase with what you’ve already got – you’ll spend more wisely, buying stamps that compliment rather than duplicate what you already own.
Adding in your MOUNTED Stamps
With mounted stamps, you would follow the same procedure of grouping your stamps by size, writing a number on the edge of the wood block and then storing them numerically in drawers or totes. Add the images of the mounted stamps to the catalog sheets in the appropriate categories. You may want to use the letter M in front of the numbers so you can easily identify that stamp image as one you will find in the “M”ounted stamp container.
What if you just have a few stamps?
There are many crafters who just have a few stamps and don’t intend to become a more serious “stamper.” If you’re just an occasional stamper, you can store your stamps right in with all of your other Scrapbooking/Papercrafting supplies in your ScrapRack. Just slip the stamp into a pocket page in the appropriate section of your ScrapRack. If the stamp has multiple uses, like the gift box stamp mentioned previously, just stamp out a few impressions on plain paper. Note on the paper where you’ve got the stamp stored, i.e. “see birthday section” and slip the stamped impressions into pockets in the appropriate sections. Now when you look in your Christmas Section, Wedding Section, or Graduation Section, you’ll see an impression of the stamp, you’ll be reminded that you’ve got it, and chances are you’ll get more use out of it. Who knows, you may even be inspired to become a full fledged “Stamper.”
Tips and Tricks
Read this article on our website to see more images - click here.If your stamp came in a package that had a background card with the image of the stamp printed on the card. Use the card as the background in the storage pockets.

To make it easier to put stamps away when you’re done with them, write the pocket number on the thin sheet of plastic that holds yours stamp set together. We’ve done it at the top of this stamp. It’s number – 6102
If you’ve got a stamp on loan to a friend, put a reminder note in the pocket where the stamp belongs. Indicate on the note to whom and when you lent it out.
If you’re using CTMH stamps, use the lightweight foam pad they come packaged with in the pocket with the stamp. Not only does it provide and extra layer of protection, it also keeps your stamp from sliding around in the pocket.
While you’re working with your storage pages keep them on a Spinder, but off your ScrapRack. This will make the easy to load but keep them from “slipping” around.
5.27.2010
Get your Glue Dots, Pop Dots, and other Adhesives Organized


Hi Scrapper's -
We've spent the last couple of weeks moving into our new offices. One really nice thing about our new space is that we've got a separate "scrapping" room. Imagine having a place to crop while you're at work (this could be dangerous). Anyway, as I began moving into this new scrapping space, (which gave me a chance to PURGE), I had a great idea - I think it was a great idea, you might feel differently. I had always kept all of my adhesives together. As I was rearranging and reorganizing, I thought, why not put all those flat adhesives into a couple of storage pages, that way, I would be able to see them without digging through the pile. So I did, and it worked great. I took my Pop Dots, Glue Dots, Foam Squares, and a bunch of other flat adhesives and put them into a couple of pages. then I added plain self adhesive photo corners and my small clear "memorabilia" envelopes, you know the type that you put baby teeth, or hair into. I have to say, not only can I see what I've got, I can see how much of it I've got. I think it's giong to work out well. Here are a couple of pictures. I used the new Mix-N-Match page and the Fabulous Four. Let me know your thoughts. This also makes it really easy to take them to a crop!

5.23.2010
Need your opinion - New TravelPack Colors
It's time to choose new colors for the fall TravelPack collection. What do you think? Here's what we're considering:
Black on Black with the embroidery color Gold, Silver or Pearl White
Lavender/Purple - we've done this before
Dark Pink / Light Pink with Dark Pink embroidery
Which color combo do you like?
Do you have an idea for a different color combo?
Post your comments and let me know.
THANKS!! - Tiffany
Black on Black with the embroidery color Gold, Silver or Pearl White
Lavender/Purple - we've done this before
Dark Pink / Light Pink with Dark Pink embroidery
Which color combo do you like?
Do you have an idea for a different color combo?
Post your comments and let me know.
THANKS!! - Tiffany
5.22.2010
Use your ScrapRack for Knitting and Crochet
Most crafters are what is affectionately referred to in the crafting industry as "Cross-Crafters." No, industry professionals don't think you're an angry bunch, the term refers to crafty people who do multiple-crafts and use products from one category in another. Recently I received the following information from a ScrapRack user who has turned her ScrapRack into a Multi-Craft Storage device by incorporating some of the components for her knitting and crochet. Here's what she has to say:
Hi Tliffany,
Pictures don’t do it justice…


 The BEST thing about The ScrapRack is its versatility! I can’t over emphasize that feature… So being an avid crocheter and knitter, it didn’t take me long to determine that I could transform it from a Scrapbooker’s dream to a yarn enthusiast’s one. The different available pages provided and the ability to use other commercially available page protectors have helped me create my own crochet/knitting workstation. A work in progress, I’ve already created one spinder for storing knitting needles, one spinder for crochet hooks (and darning needles, markers, cable makers, etc) and several spinders for sorting categories of patterns. As projects are completed, one spinder is to be used for keeping pictures, snippets of yarn used, yarn laundering instructions, etc.
I have spend several days now collecting needles which were stored all over the house, consolidating patterns and working through the best ways (for me) to organize it all. The only “wish” I would have is that to utilize The ScrapRack for this type of organization the pages would be of the heavier type (like the side opening storage of 12” paper). The other “problem” I ran into was keeping the knitting needles from falling out when I turned the pages.
Now for an ah ha moment! Probably everyone else already knew…but it took me this endeavor to figure out that as I was organizing a spinder, if I took it and laid it on my table and opened it to add pages…other pages didn’t fall out! Never again will I suffer the opening of a spinder to add a page or two only to have have the pages slip off/out of the rings. I always thought I needed an extra hand. (it was the only complaint I ever had with this storage system!)
So…I’ve now taken my original ScrapRack Station and converted it away from Scrapbooking to holding my Card Making …with sections for card layout inspirations, technique directions, completed cards, and random stamped images. And..oh yes,, holding all my “bling”.
Perhaps I can figure out places to put a Scrap Rack to organize Recipes, jewelry, beading supplies (a new craft to start?), oh, the use of the ScrapRack is so vast!
Thanks so much for this flexible tool!
Lynn
As we working to develop our website you'll see lots of new additions to help you as a "Cross-Crafter" if you've got ideas about different ways to use our products we'd love to hear them. Please email them to me at TSpaulding@TheScrapRack.com.
Thanks for checking in!
Happy "Cross-Crafting",
Tiffany
Hi Tliffany,
Pictures don’t do it justice…


I have spend several days now collecting needles which were stored all over the house, consolidating patterns and working through the best ways (for me) to organize it all. The only “wish” I would have is that to utilize The ScrapRack for this type of organization the pages would be of the heavier type (like the side opening storage of 12” paper). The other “problem” I ran into was keeping the knitting needles from falling out when I turned the pages.
Now for an ah ha moment! Probably everyone else already knew…but it took me this endeavor to figure out that as I was organizing a spinder, if I took it and laid it on my table and opened it to add pages…other pages didn’t fall out! Never again will I suffer the opening of a spinder to add a page or two only to have have the pages slip off/out of the rings. I always thought I needed an extra hand. (it was the only complaint I ever had with this storage system!)
So…I’ve now taken my original ScrapRack Station and converted it away from Scrapbooking to holding my Card Making …with sections for card layout inspirations, technique directions, completed cards, and random stamped images. And..oh yes,, holding all my “bling”.
Perhaps I can figure out places to put a Scrap Rack to organize Recipes, jewelry, beading supplies (a new craft to start?), oh, the use of the ScrapRack is so vast!
Thanks so much for this flexible tool!
Lynn
As we working to develop our website you'll see lots of new additions to help you as a "Cross-Crafter" if you've got ideas about different ways to use our products we'd love to hear them. Please email them to me at TSpaulding@TheScrapRack.com.
Thanks for checking in!
Happy "Cross-Crafting",
Tiffany
5.16.2010
Update on Page Arrival
To all of you who have been waiting so patiently for our pages to arrive from China. Well, after a couple of crazy delays, our freight company has given us a port arrival date of May 24th. If all goes well with US Customs, we should be able to start shipping the 25th or 26th. Keep your fingers crossed!! This new order does include Embellishment Storage Pages, Super Sized Singles (10 pack and 50 pack), Fabulous Four, mix-n-Match pages and a few others.
Thanks again for hanging in their with us, we know it's bee frustrating.
Tiffany
Thanks again for hanging in their with us, we know it's bee frustrating.
Tiffany
5.06.2010
Join our Absolute Organization Seminar at a Scrapbook Show in your area
Hi Scrappers and Paper Crafters -
Did you know I get to travel around the country and teach Organization Seminars at the major Scrapbook Shows. If you need help getting your crafting supplies organized I'd love to see you at a seminar. Here's a list of the shows where I'll be teaching. The links will take you to the show home pages. You'll find my seminar listed as Absolute Organization in the workshop listings for each show. We have sold out at a couple of shows already, but some shows haven't started selling tickets yet so they will still be available. If you have Scrap and Craft pals that need help getting organized please forward a link to them.
Looking forward to seeing you in person!
Tif
June 3-5 Great American Scrapbook Show - Arlington, Texas
Creating Keepsakes - Riverside, CA
Absolute Organization Seminar ONLY - June 18, 6:00-7:30 PM
July 8-11 - Atlanta Scrapbook Expo
Booth and Seminar
July 15-17 - Puyallup Scrapbook Expo
Booth and Seminar
August 5-8 - Santa Clara, CA, Scrapbook Expo
Booth and Seminar
August 13-14, Creating Keepsakes - Charlotte, NC
Booth and Seminar
August 25-29 - Creating Keepsakes, Nashville
Booth and Seminar
September 15-19, Creating Keepsakes, San Marcos, TX
Booth and Seminar
October 21-24, Ontario, CA- Scrapbook Expo
Booth and Seminar
November 11-13, Creating Keepsakes, Seattle, WA
5.05.2010
GREAT way to organize/control your computer cords
Hello to all -
I'm so sorry I've been MIA from Blog World for such a long time. As many of you may already know I had a major heatlh issue which is now mostly resolved. So hopefully, I'll be back on track with Blog Posts. This one is short, sweet, simple, and NOT my own idea. It was sent to me by one of my regular "Organizer" Pals but I thought it was worth a quick entry. Please feel free to pass along a link, this is something everyone could use! Just large Binder Clips from the office supply store. Short, Sweet, Simple - and for most of us something we already own! Love It!!

I'm so sorry I've been MIA from Blog World for such a long time. As many of you may already know I had a major heatlh issue which is now mostly resolved. So hopefully, I'll be back on track with Blog Posts. This one is short, sweet, simple, and NOT my own idea. It was sent to me by one of my regular "Organizer" Pals but I thought it was worth a quick entry. Please feel free to pass along a link, this is something everyone could use! Just large Binder Clips from the office supply store. Short, Sweet, Simple - and for most of us something we already own! Love It!!

Get your Computer Cables Neat and Organized.
3.02.2010
Purge, Purge, Purge
As many of you embark on your "Spring Cleaning" projects, organizing and tiding up your scrapbooking supplies will probably end up somewhere on the list. I have just one word for you - PURGE! If you've been Scrapbooking for more than a year I'm certain there are things in Scrapbook Supply Collection that you will never use. It's time to get them out of your way so you can find the things you will use!
How to PURGE
Set a Purge goal. You can do it by weight, by depth (how full to fill the box) or by age of products. It doesn't matter, just set a goal.
As you go through your supplies, eyeball your various products. If you don't think you'll use them, if you no longer think they're "Adorable", if the people you Scrap About are no longer involved in that activity, and your pictures have been scrapped - toss the items into your PURGE box.
Be Resolute! If something goes into the PURGE box it stays in the PURGE box.
When you're all done, give the PURGE box away! To a school, Sunday School, Hospital, or even to your own "crafty kids."
Ahhhhh.....there now doesn't that feel better!
The next time you sit down to scrap you'll find that you are more relaxed and because you have less stuff to dig through you're actually getting more done.
Subscribe to:
Posts (Atom)